Difference between revisions of "How to configure WPAD"
(→Configuration Hint - Proxy) |
|||
| (20 intermediate revisions by the same user not shown) | |||
| Line 1: | Line 1: | ||
{{DISPLAYTITLE:How to configure WPAD}} | {{DISPLAYTITLE:How to configure WPAD}} | ||
| − | + | '''* * * THIS PAGE IS UNDER CONSTRUCTION * * *''' | |
| − | This How- | + | This How-to will describe how to configure WPAD on IPBrick. |
| − | + | These configurations allow a user to access an Intranet server without needing to use a proxy service as an intermediary and, at the same time, prohibits an external access without a proxy server. The first aspect promotes a better performance and the second one prevents security issues. | |
| − | + | ||
| − | + | Two scenarios will be presented here: | |
| + | # The first scenario will show the configurations for one IPBrick. | ||
| + | # The second scenario will demonstrate how to configure WPAD between two IPBrick servers: | ||
| + | #* One IPBrick is the Intranet server where DHCP and DNS services will run; | ||
| + | #* One IPBrick is the security server where Proxy service will run. | ||
| + | The following examples will explain step by step how to configure a WPAD (Web Proxy Auto-Discovery) for both scenarios. | ||
| − | |||
| − | + | == First scenario == | |
| − | + | [[File:cenario1.jpeg]] | |
| − | + | ||
On our first scenario, the aim is to configure WPAD with an IPBrick as an Intranet server, where DHCP and DNS services will run. | On our first scenario, the aim is to configure WPAD with an IPBrick as an Intranet server, where DHCP and DNS services will run. | ||
| Line 22: | Line 24: | ||
In order to do this we have to: | In order to do this we have to: | ||
| − | # | + | # DHCP: activate WPAD. |
| − | #* Go to ''Advanced configurations » Support services » DHCP » Subnets » General options''; | + | #* Go to ''Advanced configurations » Support services » DHCP » Subnets » General options''; [[File:subnets.png]] |
| − | + | #* On ''Proxy Auto-configuration'', select ''Yes'' (by default is set up to ''No''). [[File:proxyautoconfiguration.png]] | |
| − | [[File:subnets.png]] | + | # Proxy: activate WPAD. |
| − | + | #* Go to ''IPBrick.C » Proxy » Auto-configuration''; [[File:proxyautoconfiguration3.png]] | |
| − | * On ''Proxy Auto-configuration'', select ''Yes'' (by default is set up to ''No''). | + | #* On ''Auto-configuration » Enable Auto-configuration'', select ''Yes'' (by default is set up to ''No''). [[File:proxyautoconfiguration2.png]] |
| − | + | ||
| − | [[File:proxyautoconfiguration.png]] | + | |
| − | + | ||
| − | + | ||
| − | + | ||
| − | * Go to ''IPBrick.C » Proxy » Auto-configuration''; | + | |
| − | + | ||
| − | [[File:proxyautoconfiguration3.png]] | + | |
| − | + | ||
| − | * On ''Auto-configuration » Enable Auto-configuration'', select ''Yes'' (by default is set up to ''No''). | + | |
| − | + | ||
| − | [[File:proxyautoconfiguration2.png]] | + | |
'''Note:''' There is no need to configure anything for DNS because it already points to the server in question. | '''Note:''' There is no need to configure anything for DNS because it already points to the server in question. | ||
| Line 45: | Line 35: | ||
== Second scenario == | == Second scenario == | ||
| + | |||
| + | [[File:cenario2.1.jpeg]] | ||
On the second scenario, the aim is to configure WPAD with an IPBrick as a security server, where Proxy server will run. | On the second scenario, the aim is to configure WPAD with an IPBrick as a security server, where Proxy server will run. | ||
| − | So, in this case, we have to servers. One of them is an | + | So, in this case, we have to servers. One of them is an Intranet server which is connected to our LAN; the other is a communication server that links our LAN to the Internet. |
As a practical example, let's call "srv01" to our internal server and "srv02" to the external one; "srv01" lodges DNS and DHCP services and "srv02" acts as a proxy. | As a practical example, let's call "srv01" to our internal server and "srv02" to the external one; "srv01" lodges DNS and DHCP services and "srv02" acts as a proxy. | ||
| − | + | # To configure our "srv01": | |
| − | + | #* DNS: it's lodged on "srv01" but it has to point to "srv02". | |
| − | * DNS: it's lodged on "srv01" but it has to point to "srv02". | + | #** Go to ''Advanced configurations » Support services » DNS » Domains''; [[File:DNSdomains.png]] |
| − | + | #** Select your domain on ''Forward zone''; [[File:aliases.png]] | |
| − | ** Go to ''Advanced configurations » Support services » DNS » Domains'' | + | #** Here it is possible to see several configurations but, for our configuration, search for WPAD on the ''Aliases'' table; [[File:WPAD.png]] |
| − | + | #** Select ''WPAD'' and configure it to your server, "srv02"; [[File:WPADsrv02.png]] | |
| − | [[File:DNSdomains.png]] | + | #** Repeat these steps but this time search for ''Proxy'' on ''Aliases''. [[File:proxysrv02.png]] |
| − | + | #* DHCP: activate WPAD. | |
| − | ** Select your domain on ''Forward zone'' | + | #** Go to ''Advanced configurations » Support services » DHCP » Subnets » General options''; [[File:subnets.png]] |
| − | + | #** On ''Proxy Auto-configuration'', select ''Yes'' (by default is set up to ''No''). [[File:proxyautoconfiguration.png]] | |
| − | [[File:aliases.png]] | + | |
| − | + | ||
| − | ** Here it is possible to see several configurations but, for our configuration, search for WPAD on the ''Aliases'' table | + | |
| − | + | ||
| − | [[File:WPAD.png]] | + | |
| − | + | ||
| − | ** Select ''WPAD'' and configure it to your server, "srv02" | + | |
| − | + | ||
| − | [[File:WPADsrv02.png]] | + | |
| − | + | ||
| − | ** Repeat these steps but this time search for ''Proxy'' on ''Aliases''. | + | |
| − | + | ||
| − | [[File:proxysrv02.png]] | + | |
| − | + | ||
| − | * DHCP: activate WPAD. | + | |
| − | + | ||
| − | ** Go to ''Advanced configurations » Support services » DHCP » Subnets » General options''; | + | |
| − | + | ||
| − | [[File:subnets.png]] | + | |
| − | + | ||
| − | ** On ''Proxy Auto-configuration'', select ''Yes'' (by default is set up to ''No''). | + | |
| − | + | ||
| − | [[File:proxyautoconfiguration.png]] | + | |
Now we have both DNS and DHCP configured on our "srv01", pointing to "srv02". | Now we have both DNS and DHCP configured on our "srv01", pointing to "srv02". | ||
| − | + | #To configure "srv02": | |
| − | + | #* Proxy: activate WPAD. | |
| − | * Proxy: activate WPAD. | + | #** Go to ''IPBrick.C » Proxy » Auto-configuration''; [[File:proxyautoconfiguration3.png]] |
| − | + | #** On ''Auto-configuration » Enable Auto-configuration'', select ''Yes'' (by default is set up to ''No''). [[File:proxyautoconfiguration2.png]] | |
| − | ** Go to ''IPBrick.C » Proxy » Auto-configuration''; | + | |
| − | + | == Configuration Hint - Proxy == | |
| − | + | '''How to use a proxy to access sites which aren't running on port 80/443''' | |
| − | [[File: | + | # Let's imagine that you want to access http://site.xpto.com:81; |
| + | # Go to ''Security » Proxy » Settings » Configurations » Other configurations'' and on ''Allowed connections'' add port 81 as authorized; [[File:Proxy_port81.png]] | ||
| + | # Go to ''Advanced Configurations » Network » Firewall'' and insert the following ''General Settings'' rule: | ||
| + | #: Rule: INPUT | ||
| + | #: Interface: ETH1 | ||
| + | #: Protocol: TCP | ||
| + | #: Origin port: 81 | ||
| + | #: Parameters: ! --syn | ||
| + | #: Policy: ACCEPT [[File:Proxy_port81a.png]] | ||
| + | # Apply Configurations; | ||
| + | # Use a LAN PC and test now the connection to http://site.xpto.com:81. | ||
Latest revision as of 12:49, 4 April 2016
* * * THIS PAGE IS UNDER CONSTRUCTION * * *
This How-to will describe how to configure WPAD on IPBrick.
These configurations allow a user to access an Intranet server without needing to use a proxy service as an intermediary and, at the same time, prohibits an external access without a proxy server. The first aspect promotes a better performance and the second one prevents security issues.
Two scenarios will be presented here:
- The first scenario will show the configurations for one IPBrick.
- The second scenario will demonstrate how to configure WPAD between two IPBrick servers:
- One IPBrick is the Intranet server where DHCP and DNS services will run;
- One IPBrick is the security server where Proxy service will run.
The following examples will explain step by step how to configure a WPAD (Web Proxy Auto-Discovery) for both scenarios.
First scenario
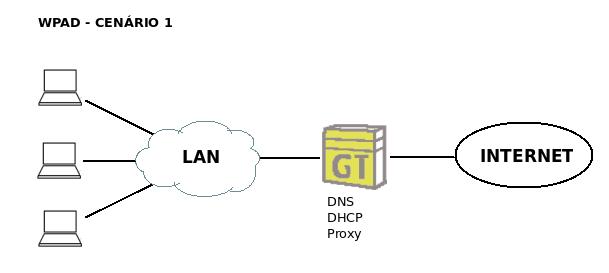
On our first scenario, the aim is to configure WPAD with an IPBrick as an Intranet server, where DHCP and DNS services will run.
In order to do this we have to:
- DHCP: activate WPAD.
- Proxy: activate WPAD.
Note: There is no need to configure anything for DNS because it already points to the server in question.
Second scenario
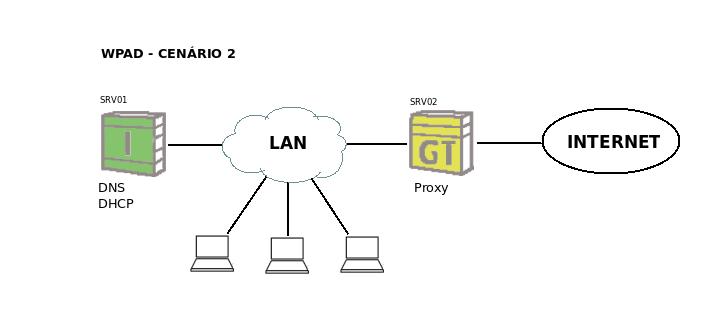
On the second scenario, the aim is to configure WPAD with an IPBrick as a security server, where Proxy server will run.
So, in this case, we have to servers. One of them is an Intranet server which is connected to our LAN; the other is a communication server that links our LAN to the Internet.
As a practical example, let's call "srv01" to our internal server and "srv02" to the external one; "srv01" lodges DNS and DHCP services and "srv02" acts as a proxy.
- To configure our "srv01":
- DNS: it's lodged on "srv01" but it has to point to "srv02".
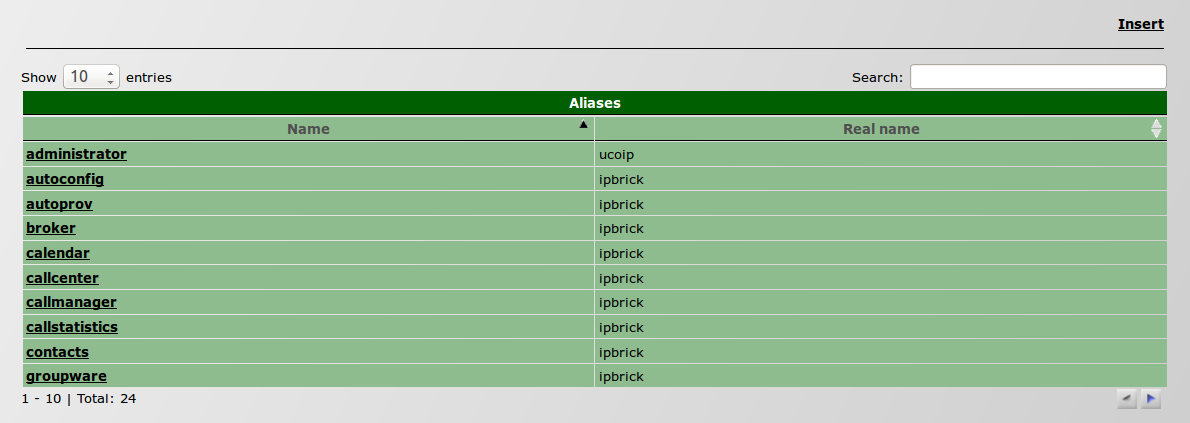
- Go to Advanced configurations » Support services » DNS » Domains;

- Select your domain on Forward zone;

- Here it is possible to see several configurations but, for our configuration, search for WPAD on the Aliases table;

- Select WPAD and configure it to your server, "srv02";

- Repeat these steps but this time search for Proxy on Aliases.

- Go to Advanced configurations » Support services » DNS » Domains;
- DHCP: activate WPAD.
- DNS: it's lodged on "srv01" but it has to point to "srv02".
Now we have both DNS and DHCP configured on our "srv01", pointing to "srv02".
- To configure "srv02":
Configuration Hint - Proxy
How to use a proxy to access sites which aren't running on port 80/443
- Let's imagine that you want to access http://site.xpto.com:81;
- Go to Security » Proxy » Settings » Configurations » Other configurations and on Allowed connections add port 81 as authorized;

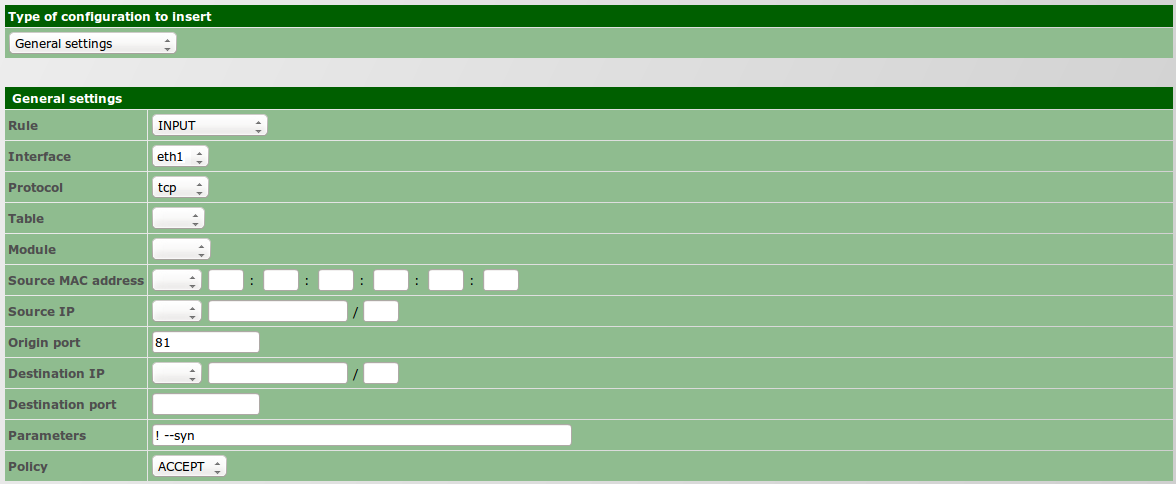
- Go to Advanced Configurations » Network » Firewall and insert the following General Settings rule:
- Apply Configurations;
- Use a LAN PC and test now the connection to http://site.xpto.com:81.


