Difference between revisions of "FAQS CAFE"
From wiki.IPBRICK.COM
(→Enable "Scheduled Videoconferences" feature) |
(→How does one configure CAFE's administration rights, in order to add polls, news items etc.?) |
||
| (6 intermediate revisions by the same user not shown) | |||
| Line 13: | Line 13: | ||
To be sure that it worked, the user may log out and log in again, just to verify his administrative permissions. | To be sure that it worked, the user may log out and log in again, just to verify his administrative permissions. | ||
| + | |||
| + | |||
| + | ---- | ||
= Enable access to IPBRICK user home folder and network shares from CAFE = | = Enable access to IPBRICK user home folder and network shares from CAFE = | ||
| Line 34: | Line 37: | ||
|- | |- | ||
|} | |} | ||
| + | |||
| + | |||
| + | |||
| + | ---- | ||
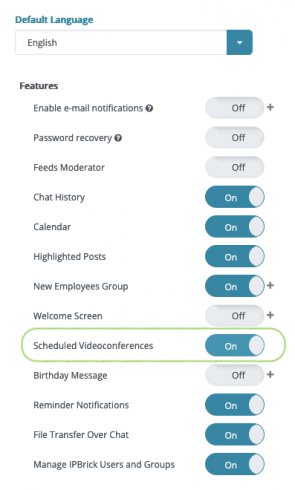
= Enable "Scheduled Videoconferences" feature = | = Enable "Scheduled Videoconferences" feature = | ||
| Line 51: | Line 58: | ||
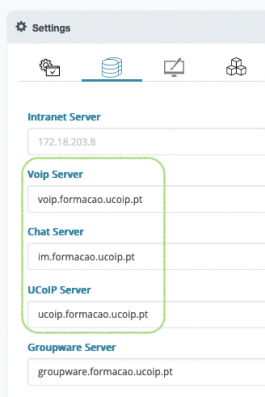
'''2. On the Servers tab, check that the servers definition is as follow and please replace "formacao.ucoip.pt" for your IPBRICK DNS domain:''' | '''2. On the Servers tab, check that the servers definition is as follow and please replace "formacao.ucoip.pt" for your IPBRICK DNS domain:''' | ||
| style="width: 25%; background-color: white;text-align:center;"| | | style="width: 25%; background-color: white;text-align:center;"| | ||
| − | '''3. On the General tab, enable the feature and save changes by clicking on the Save button on the right | + | '''3. On the General tab, enable the feature and save changes by clicking on the Save button on the right bottom corner:''' |
| style="width: 25%; background-color: white;text-align:center;"| | | style="width: 25%; background-color: white;text-align:center;"| | ||
| − | '''4. Access Scheduled Videoconference''' | + | '''4. Access Scheduled Videoconference using the button on the right bottom corner''' |
|- | |- | ||
|[[File:cafe_settings.png|180px|center|Settings]] | |[[File:cafe_settings.png|180px|center|Settings]] | ||
| Line 61: | Line 68: | ||
|- | |- | ||
|} | |} | ||
| + | |||
| + | If the option to enable "Scheduled Videoconferences" is still not available, please do: | ||
| + | # In IPBRICK command line, as "root", enter the following command: /etc/init.d/apache2 restart | ||
| + | # Logout and the Login CAFE | ||
| + | |||
| + | |||
| + | ---- | ||
= Why don't I have sound when doing a video call? = | = Why don't I have sound when doing a video call? = | ||
| − | Check if you have any other applications running that might be using your microphone. If so, please close those applications and try to do the video call again. | + | * Check that the ports used by Video Call/Conferencing are open: |
| + | |||
| + | 1- Incoming: configure the firewall to allow traffic flow from Internet to CAFE server: | ||
| + | → TCP/443 (HTTPS) - Web Server (CAFE & WebRTCProxy & UCoIP) | ||
| + | → UDP/10000 (JVB) - Network video/audio communications | ||
| + | → TCP/4443 (JVB) - Fallback network video/audio communications | ||
| + | 2- Outgoing: configure the firewall to allow traffic to flow from CAFE server to Internet: | ||
| + | → Destination port 443/TCP (HTTPS) – Web Server | ||
| + | → Destination port 50000/UDP and above to 65535/UDP (RTP) - Media Ports | ||
| + | → Source port 10000/UDP (JVB) - Network video/audio communications | ||
| + | |||
| + | * Check if you have any other applications running that might be using your microphone. If so, please close those applications and try to do the video call again. | ||
| + | |||
| + | |||
| + | ---- | ||
= IPBRICK.OS v6.x - Which communication requirements are necessary for CAFE to be operational? = | = IPBRICK.OS v6.x - Which communication requirements are necessary for CAFE to be operational? = | ||
Latest revision as of 13:04, 10 November 2021
Contents
- 1 How does one configure CAFE's administration rights, in order to add polls, news items etc.?
- 2 Enable access to IPBRICK user home folder and network shares from CAFE
- 3 Enable "Scheduled Videoconferences" feature
- 4 Why don't I have sound when doing a video call?
- 5 IPBRICK.OS v6.x - Which communication requirements are necessary for CAFE to be operational?
- 6 IPBRICK.OS v6.x - CAFE Phone is not registering
How does one configure CAFE's administration rights, in order to add polls, news items etc.?
By default, any user has a "User" profile. To promote a user to an administrator, it's necessary to assign him an "Administrator" profile.
Only an Administrator can change users permissions and, to do so, he needs to:
- Log in CAFE;
- Go to Administration » Users;
- Select the user to whom he wishes to assign administrative privileges;
- Select the profile "administrator" from the pop-list;
- Click on the button "Associate Users".
After that, it's only necessary to refresh the browser, without having to clear the cache memory. To be sure that it worked, the user may log out and log in again, just to verify his administrative permissions.
- Login in CAFE with a user that has administrator rights
|
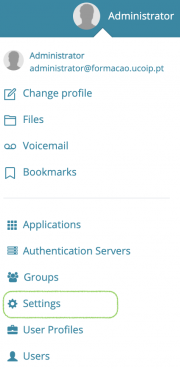
1. Go to Settings by clicking on the username on the top right corner: |
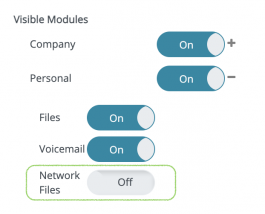
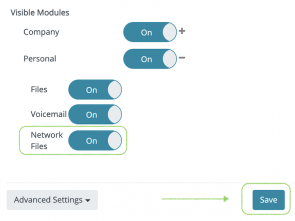
2. On the Personal module, click + to expand options: |
3. Enable Network Files access & Save: |
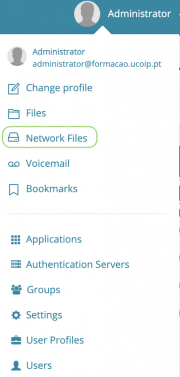
4. Access Network Files |
|
Enable "Scheduled Videoconferences" feature
- Requirements:
- IPBRICK needs to be resolving the following DNS records to its ETH0 IP address: "im", "cafe", "ucoip"
- The records "webrtcproxy", "im", "cafe" and "ucoip" needs to be resolving to IPBRICK server IP address. These records need to be set on the DNS server that hosts the IPBRICK DNS domain name.
- It must be possible to open the url https://webrtcproxy.yourdomain, for example: https://webrtcproxy.formacao.ucoip.pt/
- Login in CAFE with a user that has administrator rights
If the option to enable "Scheduled Videoconferences" is still not available, please do:
- In IPBRICK command line, as "root", enter the following command: /etc/init.d/apache2 restart
- Logout and the Login CAFE
Why don't I have sound when doing a video call?
- Check that the ports used by Video Call/Conferencing are open:
   1- Incoming: configure the firewall to allow traffic flow from Internet to CAFE server:
           → TCP/443 (HTTPS) - Web Server (CAFE & WebRTCProxy & UCoIP)
           → UDP/10000 (JVB) - Network video/audio communications
           → TCP/4443 (JVB) - Fallback network video/audio communications
   2- Outgoing: configure the firewall to allow traffic to flow from CAFE server to Internet:
           → Destination port 443/TCP (HTTPS) – Web Server
           → Destination port 50000/UDP and above to 65535/UDP (RTP) - Media Ports
           → Source port 10000/UDP (JVB) - Network video/audio communications
- Check if you have any other applications running that might be using your microphone. If so, please close those applications and try to do the video call again.
IPBRICK.OS v6.x - Which communication requirements are necessary for CAFE to be operational?
   1- Configure the firewall to allow:
           Local Network → IPBrick COMMUNICATIONS
               → TCP/5222 (XMPP) – Instant Messaging
               → TCP/8888 (WEBRTC) – Video Conference
               → TCP/10060 – Webphone
               → TCP/10062 (SSL) – Webphone
   2- Add the following addresses on the DNS server:
               → voip.<domain> pointing to IPBrick IP PBX servers IP
               → im.<domain>, ucoip.<domain> and cafe.<domain> pointing to IPBrick CAFE servers IP
   3- Install a valid SSL certificate on IPBrick server(s):
               → We use WebRTC protocol to do video conference. To work properly it's necessary to install a valid SSL certificate on IPBrick
IPBRICK.OS v6.x - CAFE Phone is not registering
- Check if service WebRTC2SIP is running
- Check if you can resolve webrtcproxy.<your domain> from the machine in which you are using CAFE
- Check if you have a valid SSL certificate installed. If you don't, first you will need to open the url http://webrtcproxy.<your domain> in order to accept the self-signed certificate.
